i spent today working on my "multi-tasker tote" by Anna Maria, it's been cut out for a while and i finally started sewing it last sunday.
i used a laminated cotton on the exterior of the bag and regular cotton fabric for the pockets and interior. the laminated cotton was a pleasure to sew (i bought a nice new non-slip foot for my sewing machine) and it is so lovely and soft
it's nearly done, just the finishing touches left - a button on a pocket, a cute flower to pin on the front, some bag feet to add and sew up the turning hole.
it's a cute bag but the instructions aren't as good as i am used to (i wouldn't recommend the pattern to a beginner), i am glad that i have made a few bags or i would have been lost!!
i added:
- a zipped pocket to the inside
- a button closure to the patch pocket
- a magnetic closure to the top
- some metal bag feet
- a cute flower pin to decorate the outside (still in the process of being made!)
i also used a different method to add the bag floor (this tutorial is the one that i used) the bag pattern directed me to iron the peltex (bag floor) to the lining and exterior, i wasn't confident that this method would be durable in the long term. the method shown in this tutorial just looks a bit more durable/practical
will post photos as soon as it is finished!
Sunday, 31 October 2010
Thursday, 21 October 2010
AHHHHHH....
OOOPS....
i just accidentally deleted 25 comments from my blog
sorry if one of the comments was yours - it was a complete accident and blogger says i cant fix it
i just accidentally deleted 25 comments from my blog
sorry if one of the comments was yours - it was a complete accident and blogger says i cant fix it
Monday, 18 October 2010
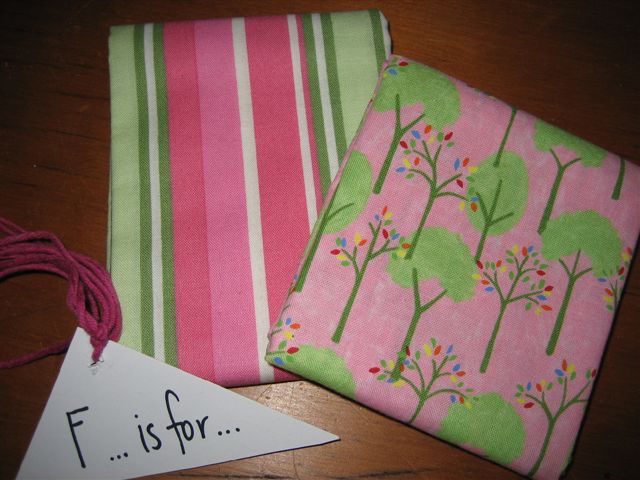
F.R.I.E.N.D.S. swap parcel received
my F.R.I.E.N.D.S. swap parcel has arrived from M at Farmyard Crafts!!
a wonderful parcel was waiting on my doorstep when i got home from work tonight - i rushed inside, ripped the post bag open like a small child on Christmas morning, and all of these wonderful gifts spilled out...
 I slowly opened each one - smiling, giggling and very excited!
F is for fabric fat quarters

R is for RicRac

I is for inspiring magnet

E is for exquisite pin cushion (made by M.)

N is for Nellie's sewing bag (made by M.)

D is for dragonfly journal

S is for swell self-covered fabric buttons (made by M.)
 i LOVE, LOVE, LOVE all of my gifts and i was so blessed to get M. as a swap partner!
a wonderful parcel was waiting on my doorstep when i got home from work tonight - i rushed inside, ripped the post bag open like a small child on Christmas morning, and all of these wonderful gifts spilled out...

F is for fabric fat quarters
R is for RicRac

I is for inspiring magnet

E is for exquisite pin cushion (made by M.)

N is for Nellie's sewing bag (made by M.)

D is for dragonfly journal

S is for swell self-covered fabric buttons (made by M.)

Sunday, 17 October 2010
Reversible ironing board cover - a little tutorial
as i said in my last post, my ironing board cover i looking tatty and sadly it didn't survive a recent encounter with the washing machine! oh, well it was a good excuse to use some lovely fabric that inherited when a friend passed away recently.
my poor old, torn, bumpy cover...

 You will need:
* fabric - approx 1.5 to 2metres, depending on the size of your ironing board and the width of the fabric
* tearaway stabiliser or butchers paper to make your pattern from
* cotton wadding - enough to cover the top of your ironing board 4 times (i bought 1.5m of wide wadding)
* 5mm wide elastic (approx 2m)
* cotton and general sewing supplies
1. remove the old ironing board cover - and throw it away to ensure that you finish your new cover!!
 4. cut 2 from your fabric and 2 from wadding
5. layer 1 of your fabric pieces with 1 of your wadding pieces. quilt as desired. i simply quilted some straight lines. repeat with the other piece of fabric and wadding.


6. place your 2 quilted panels right sides together and sew around the edges (use a generous 1/4" seam) remember to leave an opening so you can turn your cover right side out!! i left my opening in the wide end of the cover

7. turn your cover right side out (pause to admire your creativity!!) and press. when you get to the opening, remember to press the seam allowance in - this will make sewing it closed easier
8. now it's time to sew a casing for your elastic. you will need to sew a line 1/2" from the edge of your cover. sew all the way around.
9. it's time to get the elastic into your casing. pin your elastic to the cover (so that the end doesn't disappear into the casing) attach a safety pin/bodkin to the opposite end of the elastic and start threading it through the casing - this can be a bit fiddly, but persist, we are nearly done!

10. pause to thank your quilting assistant for his help

11. put your cover onto your ironing board and adjust the length of your elastic. when you are happy with the fit, tie the 2 ends together with a knot.
12. slip stitch the opening closed, make sure that you tuck the elastic in as you sew

13. because my ironing board is getting on and is a little rusty (don't want rust on my new cover!), i cut 2 layers of wadding the same size as the top and put the cover on over them.
14. put your new cover on your ironing board and adjust the gathers until you are happy.

15. step back and smile... you have a beautiful new ironing board!

my poor old, torn, bumpy cover...

* fabric - approx 1.5 to 2metres, depending on the size of your ironing board and the width of the fabric
* tearaway stabiliser or butchers paper to make your pattern from
* cotton wadding - enough to cover the top of your ironing board 4 times (i bought 1.5m of wide wadding)
* 5mm wide elastic (approx 2m)
* cotton and general sewing supplies
this is a simple tutorial and i am assuming that you will have some basic sewing skills
1. remove the old ironing board cover - and throw it away to ensure that you finish your new cover!!
2. put some paper/tearaway stabiliser on the floor and place your ironing board top down. trace around the edges.
3. draw a line approx 4" out from your ironing board outline. this is an allowance for the sides of the ironing board top, an underlap and a seam allowance. cut out on this line. in my photo you can see how much bigger the pattern is...

5. layer 1 of your fabric pieces with 1 of your wadding pieces. quilt as desired. i simply quilted some straight lines. repeat with the other piece of fabric and wadding.


6. place your 2 quilted panels right sides together and sew around the edges (use a generous 1/4" seam) remember to leave an opening so you can turn your cover right side out!! i left my opening in the wide end of the cover

7. turn your cover right side out (pause to admire your creativity!!) and press. when you get to the opening, remember to press the seam allowance in - this will make sewing it closed easier
8. now it's time to sew a casing for your elastic. you will need to sew a line 1/2" from the edge of your cover. sew all the way around.
9. it's time to get the elastic into your casing. pin your elastic to the cover (so that the end doesn't disappear into the casing) attach a safety pin/bodkin to the opposite end of the elastic and start threading it through the casing - this can be a bit fiddly, but persist, we are nearly done!
10. pause to thank your quilting assistant for his help

11. put your cover onto your ironing board and adjust the length of your elastic. when you are happy with the fit, tie the 2 ends together with a knot.
12. slip stitch the opening closed, make sure that you tuck the elastic in as you sew

13. because my ironing board is getting on and is a little rusty (don't want rust on my new cover!), i cut 2 layers of wadding the same size as the top and put the cover on over them.
14. put your new cover on your ironing board and adjust the gathers until you are happy.

15. step back and smile... you have a beautiful new ironing board!
DIY Dish
i have been following the DIY Dish blog for a while now and this handbag is really cute and so is their owl pincushion
I'm working on making a new cover for my ironing board - the old one was in a disgraceful state! i am planning on posting a little tutorial soon.
I'm working on making a new cover for my ironing board - the old one was in a disgraceful state! i am planning on posting a little tutorial soon.
Friday, 15 October 2010
Disappearing 9 Patch - variation on a theme
Add a plain square to a D9P square and you get so many more layout options!
Simply...
- cut a square of fabric the same size as the D9P block (after your 9 patch has been quartered)
- draw a line from corner to corner on your plain square
 - place your plain square on top of a D9P block (right sides together)
- using the line as a guide, sew 1/4 inch seam down each side of the line
- cut apart on the line
 - press your block (seam goes towards the plain square)
 - you should have 2 mirror image blocks
and here are some layout ideas....


Simply...
- cut a square of fabric the same size as the D9P block (after your 9 patch has been quartered)
- draw a line from corner to corner on your plain square

- using the line as a guide, sew 1/4 inch seam down each side of the line
- cut apart on the line


and here are some layout ideas....


Thursday, 14 October 2010


Tuesday, 12 October 2010
F.R.I.E.N.D.S. swap parcel
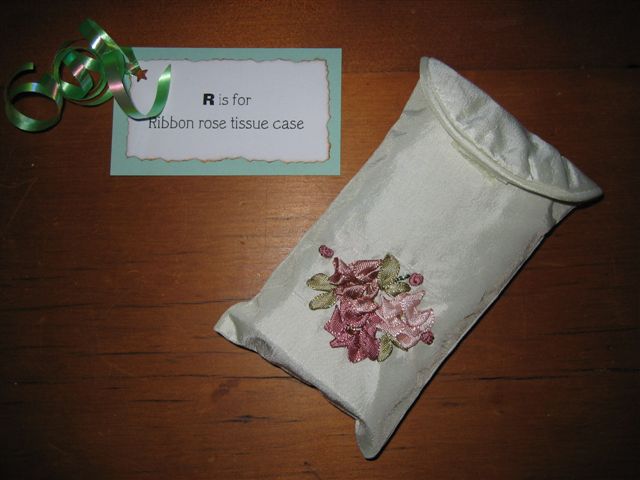
my swap parcel has arrived at M's place (and i think she is pretty happy with it!) she has posted photos on her blog Farmyard Crafts but i thought i would post a few photos here too...
F is for framed fabric
 R is for ribbon rose tissue case
 I is for incredibly cute bookmark
 E is for edible delights
 N is for new cross stitch projects
 D is for doll (made by me!)

 and a little peek at her underwear...
 and of course it was her shoes in my previous post!
S is for snap bag (made by me!)

F is for framed fabric


S is for snap bag (made by me!)

Sunday, 3 October 2010
Photos and the weekend that was
a sneak peek at one of my recent projects...
 i wonder who this parcel is for...
 got a heap of jobs done out in the garden today (with a little help from my dear dad):
- fertilised and mulched the fruit trees
- tidied up the garden edges in my front garden
- cleaned up the shed (it was looking like a bomb had gone off in there!!)
- tightened the shade sail
- planted 3 pot plants into the garden
- set up some big pots ready for the kids to plant some strawberries, carrots, cherry tomatoes, sugar snap peas and mixed lettuces (dad drilled some holes in the bottom of some cheap flexible plastic tubs)

and had a lovely Sunday afternoon nap!!
Saturday, 2 October 2010
Gardens (the joy of weeds)
weeding,
weeding,
there's always so much weeding to be done,
by everyone...
i spent 1.5hrs out in the front garden weeding yesterday, and I'm still not finished - the joys of spring!! i think maybe another 30mins and i should be done, then i need to get the mulch on before the garden is covered in weeds again
also planned for this weekend is:
- photographing my F.R.I.E.N.D.S. swap parcel and packing it up to send to M over at Farmyard Crafts
- some sewing, i really need to finish a bag that i started a few weeks ago
- mending (not my favorite job)
- avoiding the Football grand final on the TV
- post some photos on my blog, things are looking a little plain around here!
weeding,
there's always so much weeding to be done,
by everyone...
(darn kids song is stuck in my head so i thought i would put it to good use!!)
i spent 1.5hrs out in the front garden weeding yesterday, and I'm still not finished - the joys of spring!! i think maybe another 30mins and i should be done, then i need to get the mulch on before the garden is covered in weeds again
also planned for this weekend is:
- photographing my F.R.I.E.N.D.S. swap parcel and packing it up to send to M over at Farmyard Crafts
- some sewing, i really need to finish a bag that i started a few weeks ago
- mending (not my favorite job)
- avoiding the Football grand final on the TV
- post some photos on my blog, things are looking a little plain around here!
Subscribe to:
Posts (Atom)