Sunday 30 December 2012

2012 new years eve mystery quilt


yippee its new years eve mystery quilt time again!!  i am doing one from Delaware quilts.

my fabric is chosen - a variety of pinks, the finished quilt will hopefully be used to raise funds for breast cancer research...

the strips are cut...


and i am ready to sew when the rest of the clues are posted!

quick strippie quilt

one of my last minute sewing projects this christmas was a quick strippie quilt (a free pattern from Mary quilts), i made it as a gift for a friend's daughter... i LOVE the fabrics and it is so quick to whip up a quilt using this pattern!  (edited to add - my friend and her daughter LOVE the quilt too!!)

my dad was kind enough to hold it while i snapped some photos (dont you love his socks!)...

FRONT

the back was pieced together using left-overs from making the front, and i added the pink at the top/bottom so that it would be big enough

BACK

and a close up that shows the gorgeous owl print (fabrics were from spotlight and must have been printed for them because the selvedges didn't have much info from the manufacturer)

i used 1m of each of the owl print, stripey fabric and blue floral fabric, then added approx 1/2m of the pink fabric.

i used hobbs heirloom fusible wadding (it only fuses temporarily so the finished quilt is nice and soft) to minimise pinning and save time (i still like to put a couple of pins along the edges) and then quilt using a variegated thread, my open-toe walking foot and a snake/curve stitch on each seamline

unfortunately my walking foot broke mid-way through the quilting process, but i am very lucky that my mum lives 5mins away from me and she had a walking foot that i could use to finish the quilt

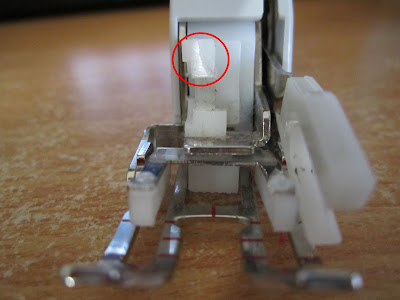
see the 2 white brackets that hold the foot to the machine?  the top one snapped off (circled in red), the foot moved out of alignment, then broke the needle and caused the machine to shudder around and make all sorts of horrible noises.  thankfully, it doesn't seem to have caused any damage to the machine.

Tuesday 25 December 2012

it's christmas day...


 2jolly-xmas.gif

merry christmas everyone, i hope the festive season is full of cheer and the year ahead is a joyful one xxx

Saturday 22 December 2012

christmas tree skirt - tutorial - part 3 (let's get sewing!!)

photos of the tree skirt are here
christmas tree skirt - tutorial - part 1 can be found here
christmas tree skirt - tutorial - part 2 is here

woo hoo, it's time to start cutting!

you will need to cut 12 wedges of fabric for the top of the skirt and another 12 wedges from the back (i managed to get all 24 of my wedges cut from 6 fat quarters of fabric).

if you are cutting from fat 1/8ths, you should be able to fit 2 wedges on (see photo).  this method would also allow you to cut 4 wedges from a fat 1/4 of fabric (fold the fat 1/4 in half before cutting)
if you are cutting from a strip of non-directional fabric you will be able to cut your wedges as shown in the photo below, continue to alternate the direction of your wedges as you work your way across the strip of fabric
you may choose to trace around your template and them use scissors to cut the wedges out, or you may choose to do what i did and use your rotary cutter, ruler and the template.  i simply placed the template on the fabric, lined my ruler up with the straight edge and cut with my rotary cutter.  once i had cut both sides, i traced the curve and tip with my pencil then cut them out using scissors.
once all of your wedges have been cut, you will need to sew them into pairs using a 1/4" seam...
then into fours...
then sixes...

then sew ONE seam that will join the 2 halves of your tree skirt.  remember to leave the other seam open, this will allow you to put the skirt around your tree.  now repeat the process for the back of your tree skirt.
now we get to decorate the top of the tree skirt.  audition your trim options and decide which one you like best.  i have decided to use 2 trims and alternate them around the skirt (remember that you wont need trim on the open edges of the skirt)
if you want to make your own seam covering strips, you will need to cut eleven 3/4"  strips (on the straight grain) from the fabric that you heavily starched earlier.  then you will need to thread a strip into your 9mm bias tape maker (you may need to use a pin to help you), making sure that your fabric is the correct way up
 flip your bias maker over and use a fork pin to hold the beginning in place
use your iron to push the bias tape maker along until you reach the end of your strip (this means that your fingers will be well away from the hot iron and minimises your chances of getting a burnt finger!).  repeat for the other 10 strips
i used my karisma glue pen to hold the trim in place, but you may choose to thread baste your trim on.  DO NOT stitch it permanently in place yet, we will stitch it on after the top of the tree skirt is stitched to the back and turned the right way out - this will quilt the layers together and provide stability.

pin your ties/ribbons in place along the open edge of the tree skirt, also make sure that you have pinned the loose ends well away from the seam lines... you wouldn't want to accidentally stitch them in!


carefully pin the top of your tree skirt to the back and stitch around all of the edges using a 1/4" seam - remember to leave an opening so you can turn it in the right way.

turn your tree skirt in the right way, press it well and top-stitch around the edges.  now is the time to stitch the seam coverings in place - i used a zig-zag on my first tree skirt, but chose to use a straight stitch on this skirt.  at this point you may also decide to add some trim around the outside edge of your tree skirt

and you are all DONE... place your skirt under the tree, tie the ribbons and admire your work!

Thursday 20 December 2012

christmas tree skirt - tutorial - part 2 (fabrics etc)

photos of the tree skirt are here
christmas tree skirt - tutorial - part 1 can be found here

there are a few choices to be made today... fabric combinations and trims so it should be lots of fun!

we will be cutting 12 wedges of fabric for the top of the tree skirt and another 12 wedges for the back; this means that there are a lot of possible fabric combinations.  some options are...
- 1 fabric for the top (all 12 wedges would be cut from the same fabric)
- 2 fabrics for the top (6 wedges from each fabric) this is the option i chose for my first tree skirt
- 3 fabrics for the top (4 wedges from each fabric)
- 4 fabrics for the top (3 wedges from each fabric)
- 6 fabrics for the top (2 wedges from each fabric) i will use 6 fabrics this time
- 12 fabrics for the top (1 wedge from each fabric)

once you have decided how many fabrics you want to use on the top of your Christmas tree skirt, you can then make a similar decision for the back of your tree skirt - this is your chance to decide if you want your Christmas tree skirt to be reversible or if you would prefer a plain back (i have chosen a plain back).

i am going with a red/white theme this time - the black/green/red holly fabric may become seam covering strips or i may decide to use some ribbon or rick-rack (i will audition my options when i have pieced the top of the tree skirt together)
the yardage that you need of each fabric will depend on how many fabrics you are using.  as an example - i can cut 2 of my wedges from a fat 1/8th, and i can cut 8 wedges from a 16" width-of-fabric strip of non-directional fabric (from my 6 red/white fat quarters i have been able to cut enough wedges for the front and back of my tree skirt, a total of 24 wedges)

you can either decide what you are going to use to cover your seams now (or you can wait and audition your options once you have pieced the top of your tree skirt).  you have a lot of choices - rick-rack, bias tape, home-made straight-grain strips (using a bias tape maker), ribbon etc.  here are some of the choices that i will be auditioning later...
you will need enough to cover the 12 seam lines - in my case each seam line is 14 1/2" (including seam allowance) you may also like to use this trim around the outside of your tree skirt

if you would like to make your own seam covering strips, you will need to heavily starch your fabric in preparation.  i cut a square of fabric 14 1/2" x 20", so that i would have enough to make the seam covering strips and to trim around the outside of the skirt.  heavily spray your seam covering fabric on both sides with a good quality starch (i use the "crisp" brand) and allow the fabric to dry before pressing it well.

gather your sewing tools and tomorrow we can get cutting and sewing!

you will need...
your fabrics
your template
a cutting mat
ruler
rotary cutter
pencil (or something to mark your fabric with)
fabric scissors
trim, to cover your seams (optional) and the outside of the skirt (optional)
9mm bias tape maker (if you are making your own seam covering strips)
karisma glue pen (optional)
sewing machine, thread and a fresh needle
1m of a narrow ribbon (for the ties on your skirt)

part 3 of the tutorial is here

Sunday 16 December 2012

christmas tree skirt - tutorial - part 1 (making the template)

photos of the skirt are here

time to make the template that you will need for your Christmas tree skirt (or you can use a 30degree wedge ruler)

you will need:
cutting mat or a large square ruler (with 30 degree lines marked on it)
ruler
template plastic (see tip)
permanent marker (to mark your template)
large plate

tip... i use cheap flexible plastic cutting mats from a local discount store instead of template plastic
** firstly you will need to measure how big you want your Christmas tree skirt to be - i used my large cutting ruler to measure from the centre of the tree trunk to the end of the legs, which gave me a measurement of 10", i added a bit extra and decided on a 14" because i wanted the skirt to be a generous size
** now we need to make the 30degree wedge template - if you look at your cutting mat (or large square ruler) you will see that it has 30 degree lines marked on it, these are the lines that we will use to make our template.  they are the 2 diagonal lines that lead away from the corner of the mat/ruler (ignore the central line that goes from corner to corner)


** place your template plastic on top of the cutting mat (or under the ruler) and transfer the 30degree lines onto the plastic
** use your marker to place a mark on the lines at the size you would like your skirt to be (in my case it was 14").

** trim an unused edge of the plastic and tape it to the top of your template (or simply add a second piece of template plastic), this will give you enough room to cut a curve at the top of your template (sorry about the sideways photo, blogger is playing games with me)
** add 1/4" seam allowance on each on the outside of your 30degree lines

** use the plate to mark a curve at the top of your template (line the edges of the plate up with the marks that you made earlier).  add a 1/4" seam allowance to the curve. 
** trim the tip off your wedge (approx. 1/2" up from the point) to allow room for the trunk of your Christmas tree

** cut out the rest of your template out and it is ready to use


christmas tree skirt - tutorial - part 2 can be found here

Sunday 9 December 2012

all skirted


and here she is in all her skirted glory...

and a close up of the skirt
it was looking a little boring till i decided to add the strips over the seam lines.  i may add some red to the edge of the skirt, but for now i am enjoying seeing it under my tree!

before...
after...
i heavily starched the dot fabric prior to cutting some 3/4" strips (on the straight-grain) and running them through my 9mm clover bias maker.  my karisma glue pen was the perfect way to hold them in place while i stitched the top of the tree skirt to the back of the tree skirt, then i used a long zig-zag stitch down the centre of each strip to hold them in place permanently (this also quilted the top and back of the tree skirt together)

anyone interested in a tutorial showing how i made this cute tree skirt??

Fabric info...
the dot fabric has been in my stash for a while and it doesn't have any info on the selvedge so i am not sure what range it is from.  the Christmas tree print is a Riley Blake print "Christmas Candy" by Doodlebug design.  the diamond print is "flurry" by Kate Spain for Moda.  both of the green prints were picked up cheaply at a post-Christmas sale earlier this year.

tutorial is here...
http://sundays-quilts.blogspot.com.au/2012/12/christmas-tree-skirt-tutorial-part-1.html
http://sundays-quilts.blogspot.com.au/2012/12/christmas-tree-skirt-tutorial-part-2.html
http://sundays-quilts.blogspot.com.au/2012/12/christmas-tree-skirt-tutorial-part-3.html

dressing my christmas tree

wish me luck, i am testing my math skills and making a 30degree wedge template so that i can make a Christmas tree skirt; inspired by  this one from the Missouri Quilt Co.

i used the 30degree lines on my cutting mat to make the template (this tutorial was also quite helpful)

hopefully by the end of today i will be able to post a photo of my Christmas tree with it's gorgeous new skirt...


Sunday 4 November 2012

Tuesday 2 October 2012

these guys just keep getting cuter

some progress has been made on my little ladies, the pink girl is ready to be stuffed and the blue girl isn't far behind ...


pattern is from AGirlinRedBoots at Etsy 
and  the lovely Lindsey at Green Beans n Strings makes my made by/care labels (as seen on the side of this doll)

my apologies to anyone who would like to comment on this post... i tried turning off word verification for a couple of days, but the number of "spam" comments i received was excessive.  so i have had to turn word verification back on.  why do these spammers feel the need to make life difficult for everyone else??

on a more personal note, i wish that i had the energy to spend more time sewing and posting here -  i love seeing bits of fabric turn into wonderful (and often useful) items.  sadly two years of unsuccessful fertility treatments has taken a toll, one that i wasn't expecting when i started trying to make my dream of having a family come true.